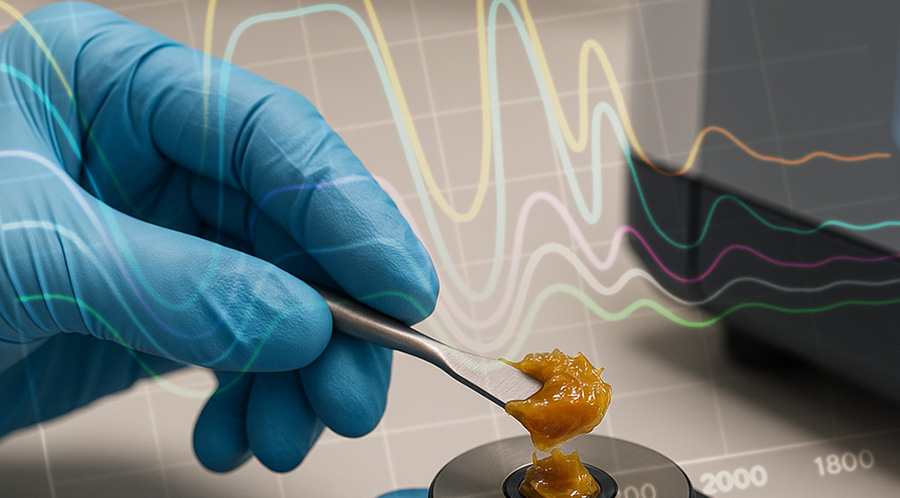
Only is grease sampling different from oil sampling, but it requires more precise and technical attention. It is not enough to “remove a little grease”: getting it wrong can lead to incorrect decisions, premature failure, or thinking that everything is fine even as the bearing is about to fail. If the sample does not represent operational reality, the analysis loses all value.
In this post, we’ll explore the dos and don’ts of taking grease samples for testing. Because a good diagnosis starts with a good sample.
What you should do when sampling greases
- Use clean and appropriate tools. Sampling equipment should be clean and dry. Cross-contamination can falsify results and lead to incorrect diagnoses.
- Take the sample in operation or just after stopping. This ensures that the grease has not decanted and that it reflects the actual operating conditions.
- Follow a regular sampling routine. Set frequencies based on equipment criticality. Grease isn’t tested as often as oil, but a poorly defined schedule can cause you to miss critical events.
- Take key information from the diagnosis. It’s not just taking the grease, but also understanding its context:
- Type of lubricant and time in use
- Machine type and materials
- Environmental conditions (contamination, humidity, temperature)
- History of failures, repairs, monitoring, and inspections
- Previous data from the same point (if any)
- Extract the sample from hotspots. The grease that lubricates is not the one that is static on the side of the bearing. You have to get to active areas.
- Preserve and transport the sample well. Use a clean, airtight bottle or syringe that is resistant to external contamination. Label it correctly.
- Compare with a control sample (new grease). To correctly interpret the results, you need to know what the grease looks like in its original state. The control sample (from the same batch, unused) serves as a reference to detect oxidation, contamination, color change, or loss of consistency.
What not to do when sampling greases
- Do not sample from exposed caps or edges. Old or contaminated grease accumulates there that does not represent the real operation.
- Don’t use general-purpose tools. No screwdrivers, swabs or improvised knives. Only syringes, stainless spatulas, or adapters designed for grease.
- Do not contaminate the sample when handling it. Avoid touching it with your hands or putting it on questionable surfaces before the bottle.
- Do not ignore the type of grease used. Each analysis must have as a reference its base, additives, thickener and type of application. The laboratory needs this information to interpret results.
- Do not compare samples from different teams without context. Each application has different conditions. Comparing without references can lead to wrong conclusions.
- Don’t forget to take action. Analysis is useless if decisions are not made: Replacement? Change in relubrication frequency? Product change?
Key analyses in the diagnosis of lubricating greases
A good grease sample without a correct analysis is like having an X-ray without a doctor to interpret it. Therefore, after sampling, it is essential to apply specific tests that allow us to know the condition of the lubricant and make informed decisions. Here are two of the most relevant.
1. FTIR (Fourier Transform Infrared Spectroscopy) Analysis
FTIR analysis is a powerful tool for identifying chemical changes in grease. By comparing the used sample with a control or new sample, it is possible to detect:
- Oxidation (degradation of the base oil)
- Presence of water or moisture
- Chemical contamination
- Loss or degradation of additives
- Thickener degradation (polyurea, lithium complex, calcium sulfonate, etc.)
In general, FTIR allows us to see the “chemical fingerprint” of the grease and how it has changed with use. It is ideal to compare with new grease and thus understand how much it has been degraded or contaminated. It is a fast, non-destructive analysis of great diagnostic value.
2. Metallographic Analysis (Optical Emission Spectrometry)
This test detects the presence and concentration of metal elements in the grease. It helps us identify wear, external contamination, or components of the lubricant itself. The most common elements and their interpretation are listed in the chart shown here.

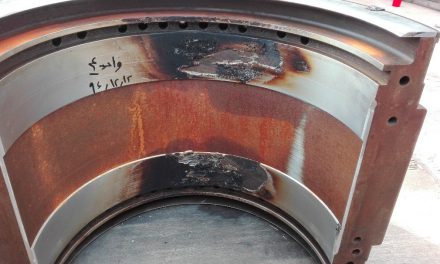
Case Study: Turret Bearing in Steelmaking
In one of the most important steel plants in the region, an Interlub technical team was called to intervene on one of the most critical bearings of the continuous casting process, located in the rotary turret. This component, subjected to high loads, temperatures and exposure to contaminants, represents a vital node in the production chain. A failure at this point not only implies very high corrective maintenance costs but also the complete stoppage of the line, with production losses that can easily exceed hundreds of thousands of dollars per hour.
Through a structured grease sampling and analysis program, which included FTIR tests and metallographic analysis, it was possible to identify:
- Early signs of oxidation in the base oil and thickener.
- Contamination by external metal dust (silicon and iron).
- Reduction in active levels of molybdenum and phosphorus, indicative of decrease in EP protection.
- Changes in the thickener structure due to temperature and mechanical stress.
With this information, an action plan was defined that included:
- Controlled lubricant change with a product formulated for these extreme conditions.
- Adjustments to the relubrication frequency.
- Periodic FTIR.
- Training the maintenance team in correct sampling practices.
The result was incredible: an unscheduled stop of the bearing was avoided throughout this campaign, extending its useful life by 15% beyond the historical average. Not only did this represent direct savings in spare parts and labor, but it also maintained continued steel production in a high-demand market.
Grease analysis: a strategic pillar in asset management
This case shows that grease analysis is not a luxury or an add-on, but a fundamental tool in predictive maintenance and intelligent asset management. In an industrial environment where reliability, availability, and cost control are key, integrating grease analysis as part of condition monitoring can make the difference between operating with excellence or living only by reaction to failures.
Don’t underestimate the power of a properly pulled and interpreted sample. Each analysis can translate into reliability, safety, and thousands of dollars in savings for your operation.


Great article. It clearly highlights the importance of proper grease sampling for reliable diagnostics.